TensorFlow 图像数据处理
什么是图像数据
图像数据是由像素组成的二维矩阵(灰度图像)或三维张量(彩色图像)。在TensorFlow中,图像通常表示为:
- 灰度图像:[高度, 宽度] 或 [高度, 宽度, 1]
- 彩色图像:[高度, 宽度, 3](RGB通道)
为什么需要图像处理
- 数据标准化:统一图像尺寸和数值范围
- 数据增强:通过变换增加训练样本多样性
- 特征提取:突出图像中的关键信息
- 预处理:为模型输入准备合适的数据格式
TensorFlow图像处理核心 API
tf.image 模块
TensorFlow提供的专门用于图像处理的API集合:
实例
python
import tensorflow as tf

from tensorflow import image as tf_image
常用功能分类:
| 功能类别 | 主要方法示例 |
|---|---|
| 色彩调整 | adjust_brightness, adjust_contrast |
| 几何变换 | flip, rotate, crop_to_bounding_box |
| 图像合成 | blend, draw_bounding_boxes |
| 格式转换 | encode_jpeg, decode_image |
| 统计操作 | total_variation, per_image_standardization |
图像预处理技术详解
标准化处理
将像素值归一化到固定范围(通常是[0,1]或[-1,1]):
实例
python
def normalize(image):

    """将uint8图像归一化到[0,1]范围"""

    image = tf.cast(image, tf.float32)  # 转换为float32

    return image / 255.0  # 除以最大值

# 使用示例

image = tf.random.uniform([256,256,3], 0, 255, dtype=tf.uint8)

normalized_image = normalize(image)
数据增强技术
通过随机变换增加数据多样性:
实例
python
def augment_image(image, label):

    """应用随机增强的图像处理流水线"""

    # 随机左右翻转

    image = tf_image.random_flip_left_right(image)


    # 随机亮度调整

    image = tf_image.random_brightness(image, max_delta=0.2)


    # 随机对比度调整

    image = tf_image.random_contrast(image, lower=0.8, upper=1.2)


    # 随机旋转(-15°到+15°)

    angle = tf.random.uniform([], -15, 15) * (3.1415/180)

    image = tf_image.rotate(image, angle)


    return image, label
图像加载与批处理流程
完整处理流程
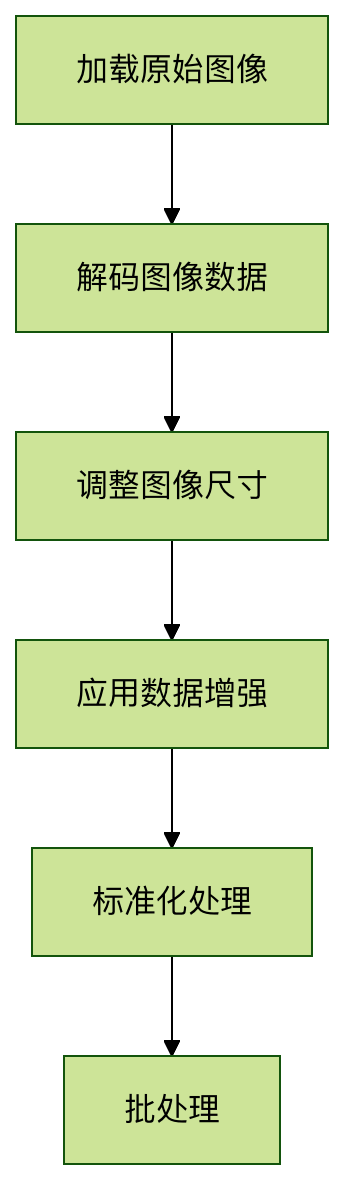
实际代码实现
实例
python
def preprocess_dataset(dataset, batch_size=32, is_training=False):

    """构建图像预处理流水线"""


    # 定义预处理函数

    def _preprocess(image, label):

        # 解码JPEG图像

        image = tf_image.decode_jpeg(image, channels=3)

        # 调整大小到统一尺寸

        image = tf_image.resize(image, [224, 224])

        # 训练时应用数据增强

        if is_training:

            image = augment_image(image)

        # 标准化处理

        image = normalize(image)

        return image, label


    # 应用预处理并创建批次

    dataset = dataset.map(_preprocess, num_parallel_calls=tf.data.AUTOTUNE)

    dataset = dataset.batch(batch_size)

    dataset = dataset.prefetch(tf.data.AUTOTUNE)


    return dataset
高级图像处理技巧
使用Keras预处理层
TensorFlow 2.x提供了更高级的预处理API:
实例
python
from tensorflow.keras.layers.experimental import preprocessing

# 创建预处理模型

augmenter = tf.keras.Sequential([

    preprocessing.RandomFlip("horizontal"),

    preprocessing.RandomRotation(0.1),

    preprocessing.RandomZoom(0.1),

    preprocessing.Rescaling(1./255)  # 标准化

])

# 在模型中使用

model = tf.keras.Sequential([

    augmenter,  # 数据增强层

    tf.keras.layers.Conv2D(32, 3, activation='relu'),

    # 其他层...

])
自定义图像处理层
实现自定义预处理操作:
实例
python
class RandomColorDistortion(tf.keras.layers.Layer):

    def __init__(self, contrast_range=[0.5, 1.5], **kwargs):

        super().__init__(**kwargs)

        self.contrast_range = contrast_range


    def call(self, images, training=None):

        if not training:

            return images


        # 随机对比度调整

        contrast_factor = tf.random.uniform(

            [], self.contrast_range[0], self.contrast_range[1])

        images = tf.image.adjust_contrast(images, contrast_factor)


        # 随机饱和度调整

        images = tf.image.random_saturation(images, 0.5, 1.5)


        return images
实践练习
练习1:图像标准化对比
加载一张测试图像,分别应用以下标准化方法并可视化结果:
- 除以255([0,1]范围)
- ImageNet均值标准差标准化(mean=[0.485,0.456,0.406], std=[0.229,0.224,0.225])
- 自定义标准化(例如,缩放到[-1,1]范围)
练习2:数据增强效果观察
选择一张图像,应用不同的增强技术组合(翻转+旋转+色彩调整),生成10个增强版本并排列显示,观察增强效果。
练习3:完整预处理流水线
构建一个完整的图像预处理流水线,包含以下步骤:
- 从TFRecord加载图像
- 解码图像
- 随机裁剪到256x256
- 随机水平翻转
- 标准化到[-1,1]范围
- 创建批次大小为32的数据集
常见问题解答
Q1:如何处理不同尺寸的图像?
A:使用tf.image.resize统一尺寸,或使用tf.image.resize_with_crop_or_pad保持宽高比的同时进行裁剪/填充。
Q2:图像处理应该在CPU还是GPU上进行?
A:通常建议在CPU上进行图像预处理,使用tf.data.Dataset.map的num_parallel_calls参数并行化处理。
Q3:如何避免数据增强导致的信息丢失?
A:合理设置增强参数范围,对于关键任务(如医学图像),谨慎使用几何变换,优先考虑色彩空间变换。
Q4:处理超大图像的最佳实践?
A:考虑使用tf.image.extract_patches将大图像分割为小块,或使用渐进式加载技术。
AI 思考中...