TensorFlow 核心概念
TensorFlow 的名字来源于其处理数据的核心结构 - 张量(Tensor)和计算流程(Flow)。
TensorFlow 是一个端到端的开源机器学习平台,它的核心优势在于:
- 灵活的计算图模型:支持动态图和静态图两种模式
- 跨平台部署能力:可在 CPU、GPU、TPU 和移动设备上运行
- 丰富的生态系统:包含 TensorFlow Lite(移动端)、TensorFlow.js(浏览器端)等子项目
- 生产就绪:提供从研究到生产的完整工具链
核心概念解析
张量(Tensor)
张量是 TensorFlow 中最基本的数据结构,可以理解为多维数组的泛化概念。
从数学角度来说,张量是一个可以用来表示在一些矢量、标量和其他张量之间的线性关系的多线性函数。
简单类比:
- 标量(0维张量):一个数字,如
5 - 向量(1维张量):一列数字,如
[1, 2, 3, 4] - 矩阵(2维张量):数字的表格,如
[[1, 2], [3, 4]] - 3维张量:数字的立方体,如彩色图像(高×宽×颜色通道)
- 更高维张量:例如视频数据(时间×高×宽×颜色通道)
张量的关键属性
实例
python
# 示例张量

import tensorflow as tf

# 创建一个 2x3 的矩阵张量

tensor = tf.constant([[1, 2, 3], [4, 5, 6]])

print(f"形状 (Shape): {tensor.shape}")        # (2, 3)

print(f"数据类型 (Dtype): {tensor.dtype}")    # int32

print(f"维度 (Rank): {tf.rank(tensor)}")      # 2

print(f"设备 (Device): {tensor.device}") # /job:localhost/replica:0/task:0/device:CPU:0关键属性解释:
形状(Shape):描述每个维度的大小
(2, 3)表示 2 行 3 列的矩阵(224, 224, 3)表示 224×224 像素的 RGB 图像
数据类型(Dtype):张量中数据的类型
tf.float32:32位浮点数(最常用)tf.int32:32位整数tf.bool:布尔值tf.string:字符串
维度/秩(Rank):张量的维数
- 标量:秩为 0
- 向量:秩为 1
- 矩阵:秩为 2
设备(Device):张量存储的设备位置
- CPU:
/device:CPU:0 - GPU:
/device:GPU:0
张量在机器学习中的意义
数据表示:
- 输入数据:图像、文本、音频都可以表示为张量
- 模型参数:权重和偏置都是张量
- 中间结果:计算过程中的所有数据都是张量
- 输出结果:预测结果、损失值等
实际例子:
- 图像分类:输入张量形状
(batch_size, height, width, channels) - 文本处理:输入张量形状
(batch_size, sequence_length) - 时间序列:输入张量形状
(batch_size, time_steps, features)
计算图(Computational Graph)
计算图是一种用节点和边来表示数学运算的图结构:
- 节点(Node):代表数学运算(加法、乘法、激活函数等)
- 边(Edge):代表数据流动的路径(张量)
简单例子:
python
计算 z = (x + y) * w 的计算图:

x ──┐
    ├─→ [+] ──→ [×] ──→ z
y ──┘         ├
w ────────────┘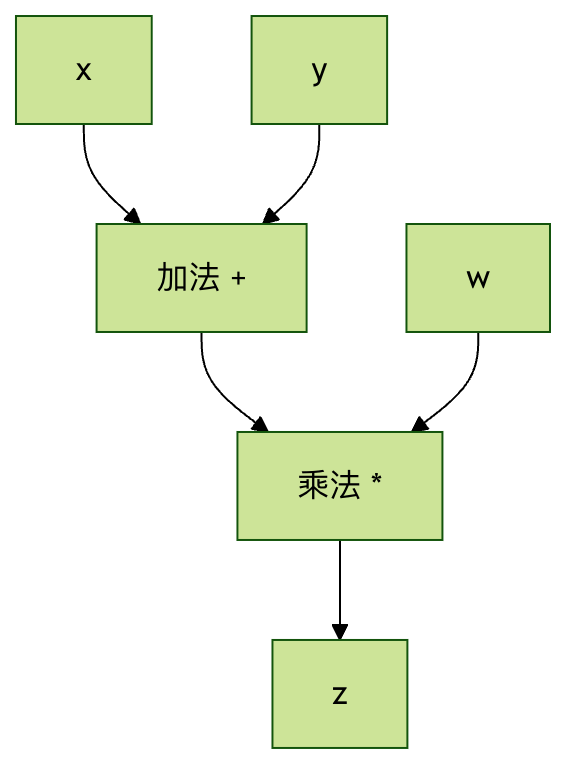
计算图的优势
1. 自动微分:
- 可以自动计算梯度,实现反向传播
- 不需要手动推导复杂的梯度公式
2. 优化机会:
- 编译时优化:合并运算、消除冗余
- 运行时优化:内存复用、并行计算
3. 可视化调试:
- 使用 TensorBoard 可视化模型结构
- 便于理解和调试复杂模型
4. 分布式计算:
- 可以将图的不同部分分配到不同设备
- 支持跨机器的分布式训练
静态图 vs 动态图
TensorFlow 1.x(静态图):
实例
python
# TensorFlow 1.x 风格(仅作理解,不推荐使用)

import tensorflow.compat.v1 as tf

tf.disable_v2_behavior()

# 定义计算图

x = tf.placeholder(tf.float32, shape=[None, 784])

W = tf.Variable(tf.random.normal([784, 10]))

b = tf.Variable(tf.zeros([10]))

y = tf.matmul(x, W) + b

# 创建会话并执行

with tf.Session() as sess:

    sess.run(tf.global_variables_initializer())

    result = sess.run(y, feed_dict={x: input_data})
TensorFlow 2.x(动态图/即时执行):
实例
python
# TensorFlow 2.x 风格(推荐)

import tensorflow as tf

# 直接执行运算

x = tf.constant([[1.0, 2.0, 3.0]])

W = tf.Variable(tf.random.normal([3, 2]))

b = tf.Variable(tf.zeros([2]))

y = tf.matmul(x, W) + b

print(y)  # 立即得到结果
会话(Session)与即时执行(Eager Execution)
TensorFlow 1.x 的会话机制
在 TensorFlow 1.x 中,计算图的构建和执行是分离的:
两阶段过程:
- 构建阶段:定义计算图,但不执行任何计算
- 执行阶段:在会话中运行图,获得结果
会话的作用:
- 管理图的执行环境
- 分配和管理资源(内存、设备)
- 提供图执行的上下文
3.2 TensorFlow 2.x 的即时执行
TensorFlow 2.x 默认启用即时执行,让 TensorFlow 变得更加 "Pythonic":
即时执行的特点:
- 立即求值:运算定义后立即执行
- 易于调试:可以使用 Python 调试工具
- 直观编程:像写普通 Python 代码一样
对比示例:
实例
python
# TensorFlow 2.x - 即时执行

import tensorflow as tf

a = tf.constant(2.0)

b = tf.constant(3.0)

c = a + b

print(f"结果: {c}")  # 结果: 5.0

# 可以直接访问值

print(f"c 的 numpy 值: {c.numpy()}")  # c 的 numpy 值: 5.0
图模式 vs 即时执行模式
即时执行模式(默认,适合开发调试):
- 运算立即执行
- 易于调试和理解
- 性能略低
图模式(适合生产部署):
- 预先构建完整计算图
- 更好的优化机会
- 更高的执行效率
切换到图模式:
实例
python
@tf.function

def compute_function(x, y):

    return x * y + x

# 这个函数会被编译成图

result = compute_function(tf.constant(2.0), tf.constant(3.0))
变量(Variable)和常量(Constant)
常量(Constant)
常量是不可变的张量,一旦创建就不能修改:
实例
python
# 创建常量

scalar_const = tf.constant(3.14)

vector_const = tf.constant([1, 2, 3, 4])

matrix_const = tf.constant([[1, 2], [3, 4]])

# 常量的值不能改变

print(scalar_const) # tf.Tensor(3.14, shape=(), dtype=float32)常量的用途:
- 存储超参数(学习率、批大小等)
- 存储不需要训练的配置数据
- 作为计算中的固定值
变量(Variable)
变量是可变的张量,通常用来存储模型参数:
实例
python
# 创建变量

weight = tf.Variable(tf.random.normal([2, 3]))

bias = tf.Variable(tf.zeros([3]))

print(f"初始权重:\n{weight}")

# 修改变量的值

weight.assign(tf.ones([2, 3]))

print(f"修改后权重:\n{weight}")

# 部分更新

weight[0, 0].assign(5.0)

print(f"部分更新后:\n{weight}")变量的关键特性:
- 状态保持:在训练过程中保持状态
- 梯度跟踪:可以计算相对于变量的梯度
- 可优化:可以被优化算法更新
- 可保存:可以保存到检查点文件
变量 vs 常量的使用场景
| 特性 | 变量(Variable) | 常量(Constant) |
|---|---|---|
| 可变性 | 可修改 | 不可修改 |
| 主要用途 | 模型参数(权重、偏置) | 超参数、输入数据 |
| 梯度计算 | 支持 | 不支持 |
| 内存占用 | 持久存储 | 临时存储 |
| 典型例子 | W = tf.Variable(...) | learning_rate = tf.constant(0.01) |
数据流动和自动微分
前向传播
数据在计算图中从输入节点流向输出节点的过程:
实例
python
# 简单的前向传播示例

import tensorflow as tf

# 输入数据

x = tf.constant([[1.0, 2.0]])

# 模型参数

W1 = tf.Variable(tf.random.normal([2, 3]))

b1 = tf.Variable(tf.zeros([3]))

W2 = tf.Variable(tf.random.normal([3, 1]))

b2 = tf.Variable(tf.zeros([1]))

# 前向传播

hidden = tf.nn.relu(tf.matmul(x, W1) + b1)  # 隐层

output = tf.matmul(hidden, W2) + b2         # 输出层

print(f"最终输出: {output}")
自动微分(Automatic Differentiation)
TensorFlow 使用 GradientTape 来记录运算并自动计算梯度:
实例
python
# 自动微分示例

x = tf.Variable(3.0)

# 使用 GradientTape 记录运算

with tf.GradientTape() as tape:

    y = x**2 + 2*x + 1  # y = x² + 2x + 1

# 计算 dy/dx

gradient = tape.gradient(y, x)

print(f"当 x=3 时,dy/dx = {gradient}")  # 应该是 2x + 2 = 8
GradientTape 的工作原理:
- 记录运算:tape 记录所有在其上下文中的运算
- 构建反向图:创建用于梯度计算的反向计算图
- 计算梯度:使用链式法则计算梯度
训练循环中的概念整合
实例
python
# 完整的训练步骤示例

import tensorflow as tf

# 模型和数据

model = tf.keras.Sequential([

    tf.keras.layers.Dense(10, activation='relu'),

    tf.keras.layers.Dense(1)

])

x_train = tf.random.normal([100, 5])

y_train = tf.random.normal([100, 1])

optimizer = tf.keras.optimizers.Adam(0.01)

# 训练步骤

@tf.function

def train_step(x, y):

    with tf.GradientTape() as tape:

        predictions = model(x)

        loss = tf.keras.losses.mse(y, predictions)


    gradients = tape.gradient(loss, model.trainable_variables)

    optimizer.apply_gradients(zip(gradients, model.trainable_variables))

    return loss

# 执行训练

for epoch in range(10):

    loss = train_step(x_train, y_train)

    print(f"Epoch {epoch}: Loss = {loss:.4f}")
核心概念总结
概念关系图
TensorFlow 核心概念关系:
python
输入数据 (Tensor) ──→ 计算图 (Graph) ──→ 输出结果 (Tensor)
      ↑                    ↓
   常量/变量            前向传播
      ↑                    ↓
   参数存储 ←──── 梯度更新 ←──── 自动微分
                              ↑
                        GradientTape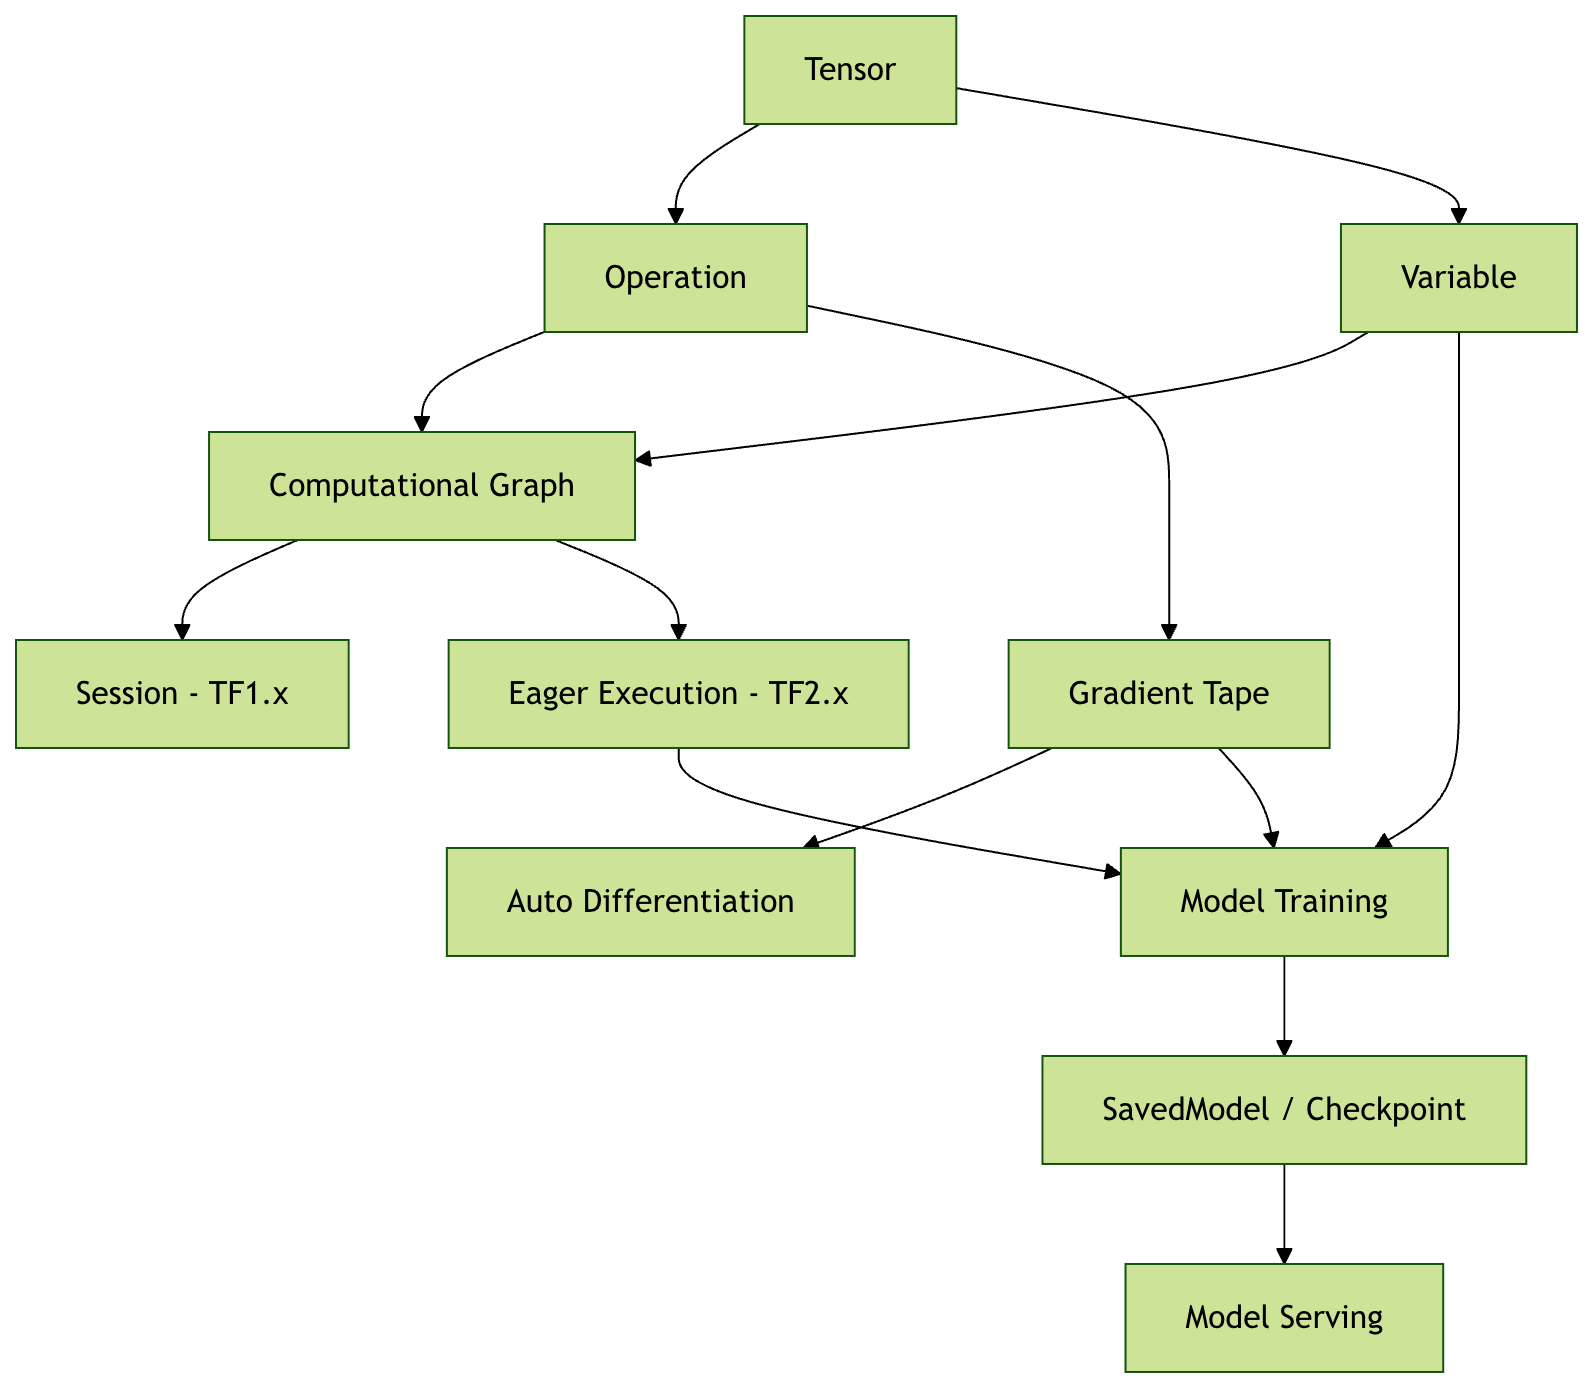
AI 思考中...